Sunday, February 19, 2012

Rib Nose Pieces


Dick is sanding a rib nose piece on an oscillating spindle sander.

Careful, slow is good.

The nose piece was cut on a jig saw, then sanded on the oscillating spindle sander.  It is important to be careful because the speed of the sander, combined with the up and down oscillating action, will remove lots of wood very fast. Dick is using very gentle pressure to remove the last little bit so the nose piece is the exact needed size.

There are only four more ribs to be built, then the spars will need to be ordered to continue completion of the wing.

Sunday, February 12, 2012

Leo's latest toys


Nice books

Leo showed me his two new books. As I flipped through them, I felt pangs of envy.  I could easily sit down on a cold winter afternoon with a pot of coffee and read either of these. They have lots of pictures (my favorite type of book), and the text is well written (easy to understand).  They can both be purchased  through the EAA. Click on the following link for more information:


New toy tool, (oops).

Leo bought this, and since I also have one, I wanted to put in a plug for this neat tool. If you have any power sanders (belt sander, spindle, disk, etc.) then you need on of these. It looks and feels like a large pencil eraser, but it removes "stuff" from the sandpaper when it gets clogged. It works like magic.  


Here is how you use it.

Yes, it is as simple as it looks. You just press it against the moving sandpaper, and it magically removes the crud that has filled the valleys.  Below is a picture of a spindle sander that Leo cleaned.

Before

After

If you look closely at the before and after photos you will see that the bottom half is now almost new. This is typical. I have seen old belts restored (in about 5 or 10 seconds) to a brand new condition. This particular spindle had some white stuff at the top that was very stubborn and would not budge. So, as you can see the cleaner isn't perfect, but it normally does wonders. Leo and I can both testify to the usefulness of this device. Also, it lasts a long time. In fact, Leo said he bought it for use at home, but he is going to cut it in half and keep half at home and half at the glider project.

Sunday, February 5, 2012

Christmas in January

Leo and John just received two packages.

Leo received his plywood to make wing gussets.

John received his epoxy.

So, you may ask, "What's the big deal, I can go to the local hardware store and buy these items." The big deal is that these are aviation grade components. That means they have gone through aviation testing that proves they can withstand the riggers of flight. So, when your life depends on it, spend the extra money. It may save your life, and you will not worry about structural failures.

Sunday, January 29, 2012

Stubborn meets Patience

Sometimes the project slows to a crawl, often because of a single task that is just plain stubborn. Case in point, the front of the glider needs a metal cross brace removed so the instructor can sit where the engine used to reside. 


Diagonal cross brace in the very front of the fuselage.

So, this should not be a very difficult job . . . just take a hack saw and cut it out, right? Okay, but first let's remind ourselves that we need to remove the cross brace, and not anything else. There lies the problem. look carefully at the picture below.

Cross brace, upper left end. 

Both ends of the cross brace have been welded in place with a large washer on top.


Vertical cut.


Horizontal cut.

Now cut the other end.

Horizontal and vertical cuts on the other end.

A little more needs to be cut, and then it will be free. Then the hard part starts. Stay tuned.

Sunday, January 15, 2012

Please, don't use a hammer to make this fit.

Dick is filing the hole for the main spar.

Dick is filing the gusset just a bit so that the "extra" is removed, and it blends into the rest of the rib structure, but how much is enough?

Leo made this tool. What does it do?

Leo's tool simulates the spar that must fit through the hole in the rib that Dick is filing. when the tool fits, Dick stops filing. Simple.

Here is how the tool is used.

When the tool is laid upon the hole, it should drop in without assistance.  In other words, DON'T USE A HAMMER! In all fairness, I watched Dick patiently use an assortment of files to trim the opening. If you zoom in your browser, you should be able to see that the tool almost fits, one end is starting to just drop in, the other end doesn't.

Tool for the rear spar.

This hole, for the rear spar, hasn't been filed yet, and as you can see if you zoom in, it has a lot of filing that needs to be done. Dick has not started on the rear spar holes yet.

Maybe next week Dick will have the holes opened up so the tools drop in without the assistance of a hammer :-)

Sunday, January 8, 2012

Big Picture Update

I was talking to John Kraft (President of EAA chapter 143) Saturday, and he brought me up to speed on the big picture, so I thought I would pass these items on to you.

First, really big news.  The Martin Museum has signed a 5 year contract with Middle River Aviation to extend their use of the facilities for another 5 years.  This is important because there are a mechanical and electrical upgrades that are needed, and they require a financial investment that would not happen without the 5 year agreement.  Likewise, we (EAA 143) can plan on having a nice home for the next 5 years, and thus plan long term projects.  Thank you MRA!

Second, we only have two more ribs to fabricate.  Then we will be ready to start the final assembly of the main wing.  We will need to order spars, fabric, etc., but nonetheless we are closing the gap on a major milestone.  A special thanks goes out to Leo for the many hours he has put in on the wing.

Fuselage, the tail needs mods to make it larger.  This requires cutting and welding tubing, then covering with fabric, and painting.

The Black Duck is a flying seaplane that is going to be moved into the Learning Center.  Currently the Grey Duck, a concept prototype, is in the learning center.  Below are photos:

Wheels, but it floats too.

Notice the small water rudder on the bottom rear.

Yes, it is a canard, which is what Canadians call a Duck

Finally, John had a great idea.  If you want, I can add your name to our EAA 143 mailing list.  That way you will have monthly update on all the events happening at the local EAA group, and if you live in the area you will be notified when and where we are having a meeting.  All you have to do is email me at agilmore@mail.com

Sunday, January 1, 2012

More Inspiration

Hi.  Since the crew is on Christmas holiday, I thought I would show you another inspiring display at the Martin Museum Learning Center.  I don't know what the make or model number of this jet is, so if you do, please leave a comment.  It is for a single person (no, I am not referring to marital status) and has twins (jet engines).  It probably has gobs of power.  Reminds me of the aircraft saying that goes, "Enough power is not nearly enough, lots of power is getting close, and way too much power is just about right."

Hopefully, next week the work will resume on the glider and these updates will be back on topic.  


The view as you approach the entrance to the Martin Museum Learning Center.

I wish my name was Maj. Phelps Digger

Jet intake.

Wing with leading edge flaps.

I couldn't resist.  I pushed one of the release buttons, and it popped out.  After I took the picture, I pushed it again, and it stayed in.  Wonder how it works?

Nice view of the jet exhaust.  Engines were removed (no, I didn't steal them).

This is where the engines reside.  I wanted to crawl inside and look at the cool workmanship, but my claustophobia said NO! 

Close up of the hinge point for the all-flying stabilizer.

Sunday, December 25, 2011

Nice Remote Control Airplane.

Okay, so what if it is a little to big to fit inside your stocking.  It is still a nice toy.  This is a P-51 remote control airplane.  It is on display in the Martin Museum Learning Center where we are working on the training glider project.  It resides just inside the entrance and I walk by it every time I enter.  I have had numerous remote control airplanes (and still do), but none are this sweeeeeet!  It has retractable landing gear (fully functional) and a large engine, 20cc or larger.  This is a master piece of workmanship.  If you got one under your tree this morning, let me know.  I will be glad to come over and help you crash fly it, ha.


Hot air balloon gondola

Here is another piece of inspiration that I walk by.  Every week I see it, I want to jump in, light the fire, and float off on an adventure . . . around the world in 80 days?


Fuel and controls.


Control panel.

Hey, not much to the control panel.  So, it shouldn't be hard to fly, right?  

I want to express my thanks to all the people who have donated these and other items to the Martin Museum for display in the Learning Center.  These projects are truly inspiring, and open our eyes to the many facets of flight.


Sunday, December 18, 2011

Root Ribs


Joe just drilled this hole in the root ribs.

It is not obvious at first, but you are looking at two root ribs.  They are side by side (one on top of the other), and held together by a few nails.  This allows Joe to cut and drill both at once, making it quicker and more accurate.


Close up view of the hole


If you look closely, you will see the small nails holding the two root ribs together.

BTW, we will not be working on the training glider project the rest of this month due to the holidays.  But, please stay tuned for more info.  If you like Christmas toys, be sure to stop back next Sunday for a look at a VERY cool aviation toy.  If you get one of these under your tree, you will have something special to smile about!

Merry Christmas!

Sunday, November 20, 2011

Root Ribs-Joe's jig

Joe's jig

The root rib needs 3/8 inch reinforcement on the edges where the main spar passes through.  Joe needed to cut some thick wood down to 3/8 inch, so he made this jig for the band saw.  It uses three parts, a straight board, and two clamps.  Not elegant, but it does the job rather well.

John and his new toy

I couldn't resist.  John was so engrossed in his new toy that he never noticed me taking this picture.  John found not one, but two used jig saws at a garage sale.  Both are in good condition.  We have one already, so why buy to more?

John, "I am going to decide which one is the best, then sell the other two.  That will give us a better tool, and will also help provide some more money for the glider project."

Sunday, November 13, 2011

Root Ribs and the yellow thingy

The old and new

The top root rib is from another Aeronca, but is very close to what we need.  It gives us a good idea of what the finished piece will look like.  The bottom root rib is actually the beginnings of two root ribs.  There are two pieces of 3/8" plywood attached together (Yes, Joe must have ordered some aviation plywood) and part of a CAD drawing is glued to the front.   They have been cut to shape, and further details will be added.


Spar hole and reinforcement

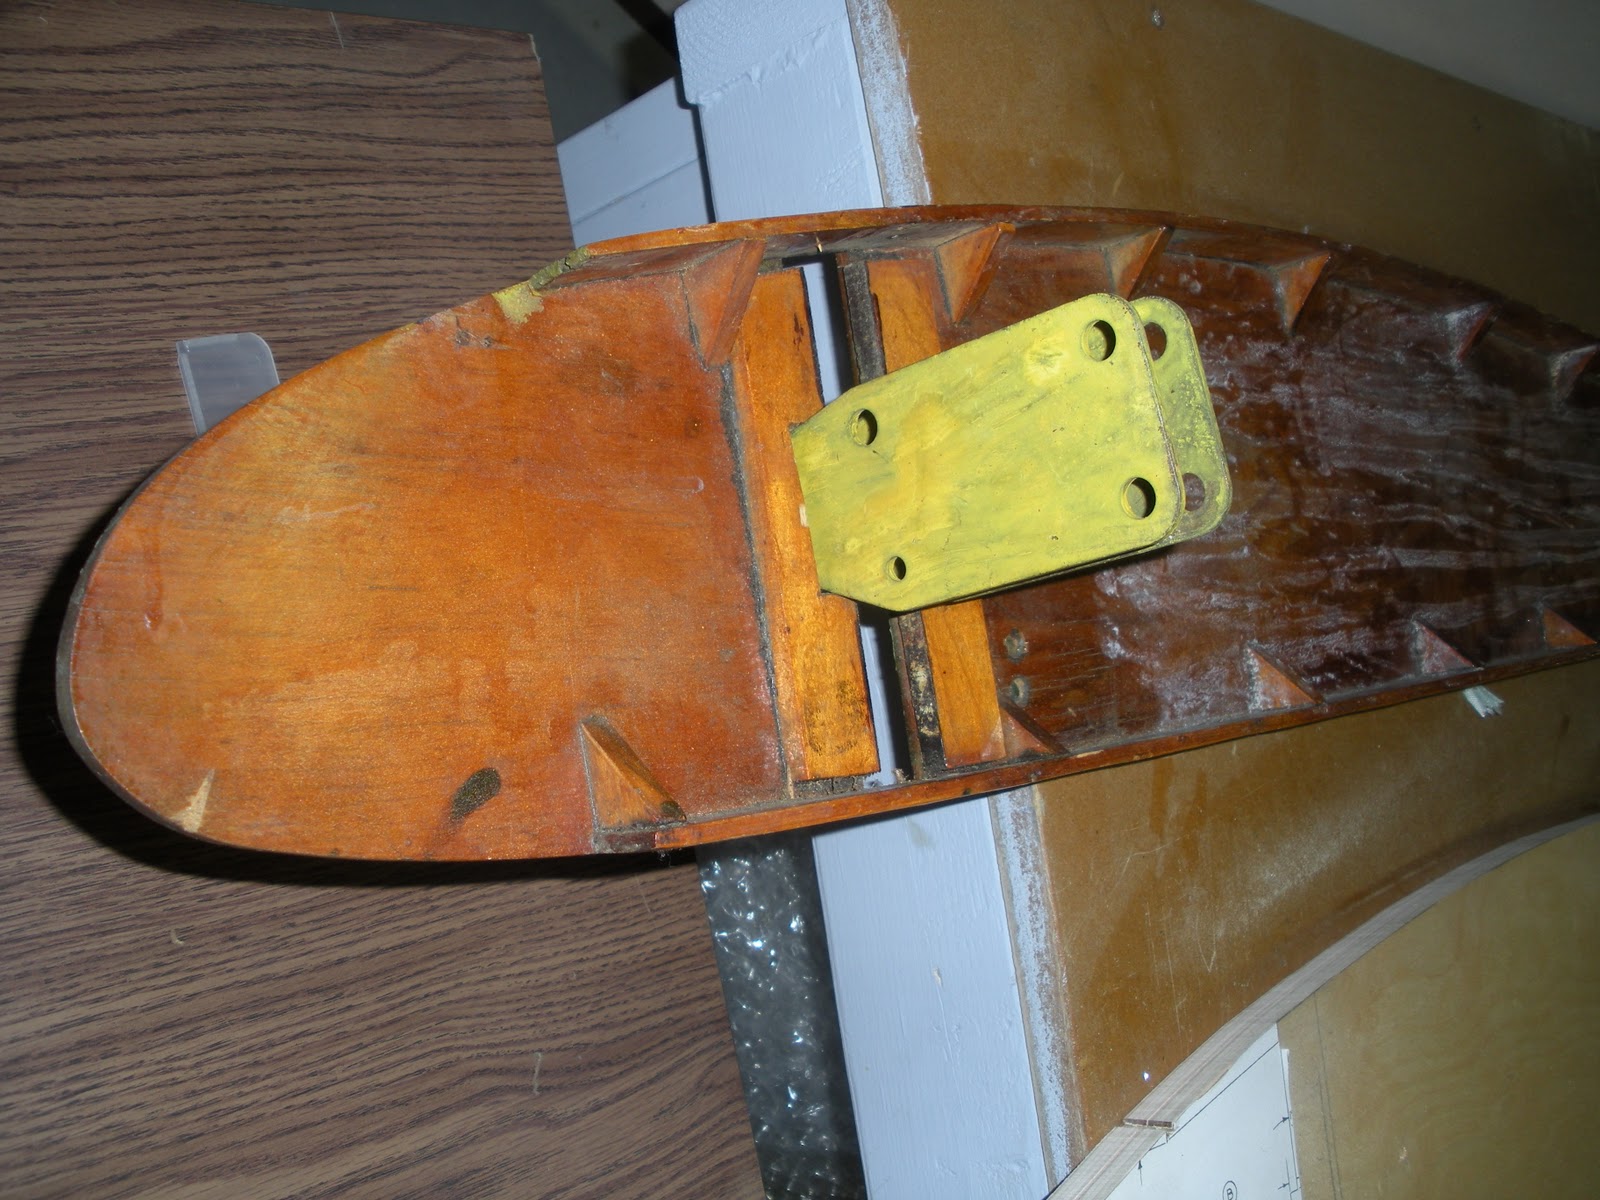
Here you can see the details of the old root rib.  First, around the edge you will notice the wide wood slat that the fabric attaches to.  It is reinforced with 90 degree gussets for strength.  The hole in the middle is for the front spar.  You will notice that there are two strips of wood that reinforce the left and right side of this hole.  There is a notch in each of these, and that makes room for the "yellow thingy".


End of spar (not shown) goes into this part of the yellow thingy

This yellow thingy is very important because it is the main attachment point for the wing.  Here the weight of the airplane is transferred to the wing, which is a lot, especially under max load.  Remember, the wings are typically stressed for maybe +4/-2 Gs (+6/-4 in some newer planes) and all that stress amounts to around five or six tons.  Divide that by two (left and right wings) and you have around three tons of force on this "yellow thingy".

The yellow thingy goes through the root rib

I flipped over the root rib so you could see the other end of the yellow thingy.

The yellow thingy attaches here to the fuselage

Leo held the assembly up to the fuselage so you could see how a single bolt attaches the yellow thingy (and wing) to the airplane.

Does anyone know what this yellow thingy is called?

Sunday, November 6, 2011

Keep thinking-Master parts

Leo, some plywood gussets, and a can of spray paint?

I was walking into the building, Leo was walking the opposite direction, "Morning Leo.  Hey, what's all that stuff you are carrying?"

Leo set the parts on a table, "These parts are the master gussets that I use to make all the other gussets.  They are always getting misplaced.  So, I thought about it, and decided it was time for some bright colored spray paint.  I'll be back in a few minutes."  With that he picked up his parts and went outside.

Leo is a thinker.  When confronted with a problem, he doesn't complain, or ask for help, but he does think about it. Then when he has connected the dots, he takes the necessary action to fix the problem. The world needs more thinkers, and more Leo's.

Sunday, October 23, 2011

Time to buy some supplies

Innermost rib.

The innermost rib of each wing is a bit different.  It is 3/8 inch thick instead of 1/4 inch like all the others.  So, Joe noticed this on the drawing, and made a note to purchase some aircraft grade plywood in 3/8 inch thickness.  BTW, it is rather expensive.  It must not have any holes or knots, and must be "certified".  So, Joe will buy some, or if you have some you would like to donate, let us know!

Sunday, October 16, 2011

Cool Piece of Hardware

This metal assembly attaches to the innermost rib

The wing has a rather large force on it (the weight of the airplane, plus G forces), so it needs a beefy piece of hardware to attach it to the fuselage.  This hefty paper weight boat anchor is the device that does the work.  it bolts to the main spar via the holes on the left.


Approximate position to fuselage.

A single bolt at the tapered end attaches the hardware to the fuselage at this position (top of windshield).

Sunday, October 9, 2011

Hmm . . . maybe

Joe's latest purchased.

Joe bought this aileron control arm on the internet (ebay?), and planned on using it for the forward control that the instructor uses.  Unfortunately, it was not quite what he needed.  It seems that there are a lot of parts for Aeronca's, and they are often different.  So, if someone thinks they have a certain part, it may be that it is for a different year or model.  

Anyhow, Joe said this piece, though not quite right, may work if it is reworked.  Stay tuned . . .