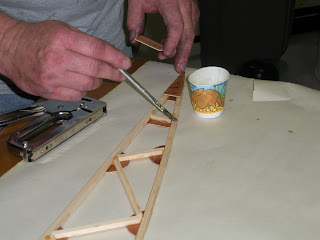
These are the first two ribs.
So, how do you take a pile of wood, and turn it into a set of finely crafted, and aerodynamically precise, wing ribs? The answer to this is answered by the two gentlemen below.
Leo Drescher (left) and John Kraft (right).
Leo and John were making the second and third ribs when I stopped in. They had finished the cutting and fitting (sanding) process and were just starting the gluing process. They were using a two part epoxy. So, I didn't want to slow them since they had a limited amount of time to do the gluing once the epoxy was mixed. I managed to stay out of their way while they did their magic.
Jig with parts in place.
The jig is important. Hmm . . . let me rephrase that, the jig is VERY IMPORTANT ! ! !
It provides a consistent airfoil across the full length of the wing. This jig was made from a perfectly flat piece of wood. Then the full size drawing of the rib was glued to it. Next, small wood blocks were screwed in place to hold the pieces in the EXACT position while being fitted, glued, and stapled.
This is a good view of the blocks of wood screwed into the jig.
I have to pause here and confess that my mouth is drooling. I have done this soooo many times before with model airplanes. If I didn't know the scale was so large, I would think it was a rib for a remote control airplane with a Cox .049 engine. Those are great memories.
Leo and John, you guys get to have all the fun. As for me, I just take pictures of you having fun :-)
Brushing on epoxy.
Notice that the curved line just below the end of the glue brush. That marks the location of the plywood gusset that will be attached. You will see that Leo stopped the brush here, because he didn't want any glue past this point (extra weight).
John is applying the gusset.
Leo is stapling the gusset.
Initially, the staples were to big. So, thinner staples were purchased. Now, they don't split the .25" x .25" wood.
Note the extra piece of wood John is holding.
Sometimes an extra piece of wood is helpful to get the edge of the gusset lined up with the edge of the cap strip.
Rib removed from jig and placed on paper.
Oops, upside down, or sideways? Sorry . . . . The parts are now locked in place and even though the epoxy has not set, it can be removed and flipped over.
The process of gluing is repeated on the other side.
Add a gusset.
Add a couple of staples.
I noticed that two guys make a good team on rib building.
Two hands would not be enough, and I suspect six hands would be too many.
Cap strip forming tool.
Leo made this forming tool. It is cut to match the curve of the top cap strip where it meets the nose piece. The top cap strips are put in hot water for an hour, then put in this tool, and clamped. After a couple of days the clamps are removed, and voila, very little spring back. Neat, huh.
I should point out that although it is not immediately obvious, this tool will hold lots of .25" cap strips.
Here is a question. I wonder how long it took Leo to cut this on the band saw? A long time? Any guesses?


No comments:
Post a Comment