Sunday, December 25, 2011

Nice Remote Control Airplane.

Okay, so what if it is a little to big to fit inside your stocking.  It is still a nice toy.  This is a P-51 remote control airplane.  It is on display in the Martin Museum Learning Center where we are working on the training glider project.  It resides just inside the entrance and I walk by it every time I enter.  I have had numerous remote control airplanes (and still do), but none are this sweeeeeet!  It has retractable landing gear (fully functional) and a large engine, 20cc or larger.  This is a master piece of workmanship.  If you got one under your tree this morning, let me know.  I will be glad to come over and help you crash fly it, ha.


Hot air balloon gondola

Here is another piece of inspiration that I walk by.  Every week I see it, I want to jump in, light the fire, and float off on an adventure . . . around the world in 80 days?


Fuel and controls.


Control panel.

Hey, not much to the control panel.  So, it shouldn't be hard to fly, right?  

I want to express my thanks to all the people who have donated these and other items to the Martin Museum for display in the Learning Center.  These projects are truly inspiring, and open our eyes to the many facets of flight.


Sunday, December 18, 2011

Root Ribs


Joe just drilled this hole in the root ribs.

It is not obvious at first, but you are looking at two root ribs.  They are side by side (one on top of the other), and held together by a few nails.  This allows Joe to cut and drill both at once, making it quicker and more accurate.


Close up view of the hole


If you look closely, you will see the small nails holding the two root ribs together.

BTW, we will not be working on the training glider project the rest of this month due to the holidays.  But, please stay tuned for more info.  If you like Christmas toys, be sure to stop back next Sunday for a look at a VERY cool aviation toy.  If you get one of these under your tree, you will have something special to smile about!

Merry Christmas!

Sunday, November 20, 2011

Root Ribs-Joe's jig

Joe's jig

The root rib needs 3/8 inch reinforcement on the edges where the main spar passes through.  Joe needed to cut some thick wood down to 3/8 inch, so he made this jig for the band saw.  It uses three parts, a straight board, and two clamps.  Not elegant, but it does the job rather well.

John and his new toy

I couldn't resist.  John was so engrossed in his new toy that he never noticed me taking this picture.  John found not one, but two used jig saws at a garage sale.  Both are in good condition.  We have one already, so why buy to more?

John, "I am going to decide which one is the best, then sell the other two.  That will give us a better tool, and will also help provide some more money for the glider project."

Sunday, November 13, 2011

Root Ribs and the yellow thingy

The old and new

The top root rib is from another Aeronca, but is very close to what we need.  It gives us a good idea of what the finished piece will look like.  The bottom root rib is actually the beginnings of two root ribs.  There are two pieces of 3/8" plywood attached together (Yes, Joe must have ordered some aviation plywood) and part of a CAD drawing is glued to the front.   They have been cut to shape, and further details will be added.


Spar hole and reinforcement

Here you can see the details of the old root rib.  First, around the edge you will notice the wide wood slat that the fabric attaches to.  It is reinforced with 90 degree gussets for strength.  The hole in the middle is for the front spar.  You will notice that there are two strips of wood that reinforce the left and right side of this hole.  There is a notch in each of these, and that makes room for the "yellow thingy".


End of spar (not shown) goes into this part of the yellow thingy

This yellow thingy is very important because it is the main attachment point for the wing.  Here the weight of the airplane is transferred to the wing, which is a lot, especially under max load.  Remember, the wings are typically stressed for maybe +4/-2 Gs (+6/-4 in some newer planes) and all that stress amounts to around five or six tons.  Divide that by two (left and right wings) and you have around three tons of force on this "yellow thingy".

The yellow thingy goes through the root rib

I flipped over the root rib so you could see the other end of the yellow thingy.

The yellow thingy attaches here to the fuselage

Leo held the assembly up to the fuselage so you could see how a single bolt attaches the yellow thingy (and wing) to the airplane.

Does anyone know what this yellow thingy is called?

Sunday, November 6, 2011

Keep thinking-Master parts

Leo, some plywood gussets, and a can of spray paint?

I was walking into the building, Leo was walking the opposite direction, "Morning Leo.  Hey, what's all that stuff you are carrying?"

Leo set the parts on a table, "These parts are the master gussets that I use to make all the other gussets.  They are always getting misplaced.  So, I thought about it, and decided it was time for some bright colored spray paint.  I'll be back in a few minutes."  With that he picked up his parts and went outside.

Leo is a thinker.  When confronted with a problem, he doesn't complain, or ask for help, but he does think about it. Then when he has connected the dots, he takes the necessary action to fix the problem. The world needs more thinkers, and more Leo's.

Sunday, October 23, 2011

Time to buy some supplies

Innermost rib.

The innermost rib of each wing is a bit different.  It is 3/8 inch thick instead of 1/4 inch like all the others.  So, Joe noticed this on the drawing, and made a note to purchase some aircraft grade plywood in 3/8 inch thickness.  BTW, it is rather expensive.  It must not have any holes or knots, and must be "certified".  So, Joe will buy some, or if you have some you would like to donate, let us know!

Sunday, October 16, 2011

Cool Piece of Hardware

This metal assembly attaches to the innermost rib

The wing has a rather large force on it (the weight of the airplane, plus G forces), so it needs a beefy piece of hardware to attach it to the fuselage.  This hefty paper weight boat anchor is the device that does the work.  it bolts to the main spar via the holes on the left.


Approximate position to fuselage.

A single bolt at the tapered end attaches the hardware to the fuselage at this position (top of windshield).

Sunday, October 9, 2011

Hmm . . . maybe

Joe's latest purchased.

Joe bought this aileron control arm on the internet (ebay?), and planned on using it for the forward control that the instructor uses.  Unfortunately, it was not quite what he needed.  It seems that there are a lot of parts for Aeronca's, and they are often different.  So, if someone thinks they have a certain part, it may be that it is for a different year or model.  

Anyhow, Joe said this piece, though not quite right, may work if it is reworked.  Stay tuned . . . 

Sunday, October 2, 2011

Latest challenge

A man deep in thought.

When I saw Joe staring at the drawings, I could tell he was facing a new challenge.  So, should I give him a penny for his thoughts?  I took a chance, "Hey, Joe, what are you doing?"

The problem.

Joe showed me the front of the fuselage where the motor mounted.  Shown in the above photo is one of four heavy duty washers that are welded to the fuse for bolting to the motor mount.  This works well for a motorized airplane, but will it work for the glider.  Remember, we are building a glider from a motorized airplane.

Back of the washer and the tube welded to it.

The above photo shows the rest of the story.  Yup, looks like a big bolt goes through the pipe and washer, then through the motor mount.  But, what to do on a glider.  The third seat has to attach here.


Glider drawing, oops.

This drawing shows the same attachment point on the glider.  The assembly is quite different.  Instead of bolts running fore-aft, they are transverse.  Instead of four washers, there are eight plates, and the attachment is completely different--hmm, what to do?

Stay tuned . . . .

Sunday, September 18, 2011

Chop Chop


Paul Straney working his magic.

This glider project began with the fuselage from a motorized airplane.  There are a few mods needed to make it fit for the glider version.  One modification requires removing the circular pipe (it looked like a veritable Hula Hoop) that was welded to the very front of the fuse and held the front edge of the fabric such that it blended into the engine.  Since there is not engine on the glider, there is no need for the Hula Hoop.  Paul cut it off, and then filed the excess metal down to make a nice smooth surface where it had been welded.  The lesson here is make sure you leave a little bit when cutting away the excess.  That way you can file it down slowly and it will look like it never had an appendage, and it will be strong because there are no nicks in the remaining metal.  Having seen Paul's handiwork, I can say that once a coat of paint is put on the fuse, you will never know it had a Hula Hoop.

Sunday, September 11, 2011

Digital French Curve circa 1945


Dick Weger sorting hardware

First, I wanted to show you Dick Weger as he charges ahead with his new task.  A shipment of hardware came in and Dick decided to sort it so the parts could be accessed quickly.  Yes, a minute saved when looking for a part is important when you have so many parts to assemble.  Let's see, if sorting saves a minute per part, and the airplane has a gazzilion parts, then Dick saved us a gazillion minutes, which divided by sixty minutes in an hour, is a boatload of hours.  Thanks Dick.

Speaking of gazillions, I was talking to Dick about his early days at Martins.  He told me about how they had to prototype 12 foot wing ribs, but did not have the die to make them.   So, they made them one at a time on a fancy thingy called a numerical controlled milling machine.  Think about this, this was around 1945, so how did they do it?  Dick said they had paper tape systems back then, and he had to punch the data into the paper tape.  Hmm, lets think about this.  The airfoil curve would have probably a gazillion data points that needed to be entered, well actually two times a gazillion (upper and lower surfaces) equals two gazillion data points.  But, Dick said they didn't have to enter that much data because they could program the paper tape with a series of curves: AKA start here, end here, use this radius, repeat.  Hence, the concept of a digital french curve.  So cool.  This is the same algorithm I use when drawing curves in my CAD system.  Same principal, but silicon chips instead of punched paper.  Thank you Dick for the interesting slice of history.

BTW, if the digital french curve reduced the data points entered by a factor of ten (just guessing), then Dick would have only entered two-gazillion divided by ten . . . wonder what that equals?

Sunday, August 28, 2011

New and Improved

EAA 143 has changed its meeting time from the fourth tuesday to the fourth Saturday at 9:30 a.m. This will hopefully accommodate member schedules better, especially since many of the members are already here for the glider project work day that occurs every week from 9:30 a.m. to 12:30 p.m.  Yesterday was the first such meeting, and I took the liberty of taking a picture of the attending members, minus myself--someone had to click the shutter :-)

Also, Irene came to the meeting (the hurricane), so numerous members didn't attend because they were battening down their hatches.

These are the attending members of EAA 143, minus the photographer :-)


A rib, is a rib, is a rib--or is it?

Problem: we didn't have a drawing for one of the ribs, the rib just inboard the aileron.  Joe Miller has a CD with lots of drawings on it, so he spent this past week looking at ribs.  Guess what, he found the missing drawing.  The photo above shows the necessary details, albeit a bit too small.  So, his next task is to send it out for enlargement.  

On a broader note: I hope you survived the hurricane with minimal inconvenience, and no damage to family or property.  Take care, and see you next week.

Sunday, August 21, 2011

Interchangeable parts

Eli Whitney would have been proud.  


Using a pattern, these nose pieces have been marked, cut, and sanded.  They are ready for assembly into a wing rib.  Doesn't it give you a sense of satisfaction to see these precision made parts, each exactly the same (within engineering tolerances), so Leo and John can grab one as they need it and build a new rib.

BTW, I wanted to let everyone know, just in case you haven't heard.  Our EAA meetings are being moved from the fourth Tuesday to the fourth Saturday (at 9:30 a.m.)  So, if you want to come out and visit, you will be able to attend the meeting, and then watch the guys in action as they work on the glider.

Sunday, August 14, 2011

A holey calling, gusset technology

The circular gussets were cut from thin plywood.

Some times the gussets are simply rectangular in shape, but in this case they are circular (same strength, but less weight).

Leo is cutting a circle from the plywood.

Leo found that the suggested method of stacking and clamping multiple layers of thin plywood did not work well.  The method he found the most success with was clamping one sheet of plywood and drilling a single gusset at a time.  Two sized hole saws are used: 3 1/5 inch for the large gussets, and 2 1/8 inch for the small gussets.


Leo is cutting the features in the gusset.

Each gusset must be trimmed to the application.  Many are simply cut in half, but some must have  notches for spars, etc.  The jig saw saves a lot of time.

Leo is showing John how to sand the rough edges that the jig saw left,
or is John supervising Leo?


Finished gussets, nice job Leo!


Sunday, August 7, 2011

Tip rib with tubing cutout (cont.)


Tip rib with master nose piece

As you can see, the hole for the tubing is clearly marked on the master nose piece.  When taking this picture, I accidentally placed this rib nose piece against another, and guess what...

Ops, they don't match...huh?

Well . . . Joe, Leo, John, and Dick are not likely to make a mistake of this magnitude.  It makes sense that the wing tapers at the tip rib.  Thinking about it, it makes a lot of sense when realizing that the goal is to taper the wing to the thickness of a pipe that fits the little hole in the front of the rib nose piece.  Speaking of that hole, how do it get there?


Dick is marking the position of the hole in the nose piece.


Dick is drilling the hole, and will sand the rest of the hole to make it a slot.

So it seems that quite a bit of work is involved in tapering the wing.  Is it worth it?  Let's just say that the vortices gremlins are not nice guys, and drag is a gliders worst enemy.

Sunday, July 31, 2011

Wing tip Rib

This wing tip, when finished, will have a pipe inserted into the front of the wing rib where the circular notch is located.  The pipe will curve back towards the trailing edge and reattach at the rear of the rib.  This will "thin" the wing for less drag, and it will look cooler too.

Sunday, July 24, 2011

Wing Ribs-Update

Where's the trailing edge?

"Hey John, did you forget something? Where is the trailing edge.  That is going to create lots of drag!"

"Not to worry, Alan, it is supposed to look like that.  It is a rib that will have an aileron mounted to it."

"Oh, right, I was just checking to see if you knew that."

As you can see, the latest ribs being produced now have a stub where the trailing edge normally resides, and yes, that is where the aileron will be mounted; progress is being made.

P.S. This is Oshkosh week.  Yippee!  See you there.

Sunday, July 17, 2011

Joe's new toy

Joe found this scale model on the internet.

The craftsmanship is remarkable.  Carved from hardwood, and painted, it has the look and feel of quality.  Very inspiring.  Most importantly, it gives us a good hands-on, and a three-dimensional perspective that the drawings can't.  

One door on the left.

Two doors on the right.

This helps us get a better feel for what we are building, and how we are going to build it.  The two photos above show the three doors, guess which one the instructor uses.

Sunday, July 10, 2011

Fuselage modification

Dick is positioning his toy soldiers on the battlefield  :-)

Actually, the toy soldiers are tubing holders.  Each holder is made from wood, cut to length, and a round notch is added at one end, then mounted with a screw to the plywood.  The plywood has been pre-marked with the pipe layout so knowing where to put them is not difficult.  The tricky part is grabbing the right toy soldier.  Each one has to have the right size round notch that will hold the tubing that will be securely held in place during the welding process.  This is a bit tricky to explain but it will all make sense in due time.  The most important concept is that the tubing needs to be held accurately, and firmly, during the welding process.

Sunday, July 3, 2011

Wing Ribs-Update

Leo strikes again!

Last time I checked, Leo (and John)  had two wing ribs.  Hmmm, reminds me of the story about rabbits,  start with two, then . . .

Yes, progress is being made.  The assembly line is up and running smoothly, Henry Ford would have been proud.  A total of twelve ribs are needed for the inner section (without ailerons).  They now have eight.  Four more to go.

John is like a kid with a new toy.  He got a new disc sander that does a real nice job of sanding the edges of the rigs where the gussets hang over the edge a little.  The right tool for the right job!

Sunday, June 26, 2011

Motorcycle?

Sweet ride . . . Triumph Speed Triple

I was walking down the street one day on my way to the EAA 143 Aeronca Glider Project when I saw this urban sports toy.  Since I had my camera, why not take a picture.  I love bikes.  Ever since I was a teen, I either had one, or wanted one.  I finally bought one when I was 15 years old, which by the way was just about the time I started flying airplanes in the Civil Air Patrol.  Anyhow, one day I was in a motorcycle store buying some parts for my Honda when I just happened to look up.  Guess what I saw.  Yep, an airplane was hanging from the ceiling.  It was an ultralight.  It was then that the light bulb went off, people that like motorcycles like airplanes.  I have notice this phenomena many times over the years, and this was no exception. Now that you know about this, you will also notice the correlation.   Oh, I forgot to mention that the Triumph was sitting in front of the EAA143 chapter meeting building.  So, when I went inside I started asking each person.  Is that your motorcycle?  John said no.  Leo said no.  Dick said no.  Joe said no.  Hey, there is a new guy here, must be his.


Paul Straney . . . the new guy.

The new guy, Paul Straney, is the biker.  Here is a picture of him working on the tail of the glider.  He is filing the rough spots that were left as a result of cutting to enlarge the vertical tail.  His background includes working for the National Guard as an Airframe Technician, A.K.A. an airplane body and fender guy.  Welcome aboard Paul!


Lunch is served every Saturday at 12:30pm

Joe cooks every week.  This week he served pulled pork and potato salad.  Joe also cooks for the monthly EAA 143 meeting which occurs the fourth Tuesday (except December).  Maybe you have heard, but if you haven't, Joe is a great cook.  It's just one more reason to come out and help :-)

Now we have one more helper, and the glider project is moving forward.  In the comming weeks I will update the progress on the wing ribs and fuselage modifications.  Stay tuned.


Sunday, June 19, 2011

Hi, just a short post today (it's Fathers Day and I have a full schedule of fun activities!)


Doccumentation for the TG-5

Every design starts with drawings.  Then it is built.  Then it is tested.  Then it is used.  So, drawings are the starting point.  We are fortunate to have a very good set of documentation for this project.  Unfortunately, it needed to be put in the proper order.  Imagine a shoe box of tax receipts that needs to be categorized and filed in proper order.  It requires lots of tedious work, and it MUST be done.  So, who is going to do it?


Documentation engineer.

The gentleman on the right, Mort Sacks, is the documentation engineer for the TG-5 project.  He is talking to the project engineer, Joe Miller.  Yes, he is willing, and has the patience to get-r-done  :-)
Mort is recuperating from knee replacement (notice the two canes), but still comes out and helps in an area that is so very critical . . . Thanks Mort!

Anyhow, here is the plug.  We need your help.  Whatever you can do, or want to do, come out and we will find something that you can do.  We need all kinds of help.  Some of you will be teachers that show others how to do a task, some of you will learn from the teachers and do a task.  This is a wonderful place to learn.  If you have any interested in aviation, this is the place to learn.  You are very welcome, and we look forward to meeting you!

P.S. We have an immediate need for a welder that can weld thin wall tubing (used in the fuselage).  If you have a background in this, please . . . contact us.

Sunday, June 12, 2011

Wing Ribs

These are the first two ribs.

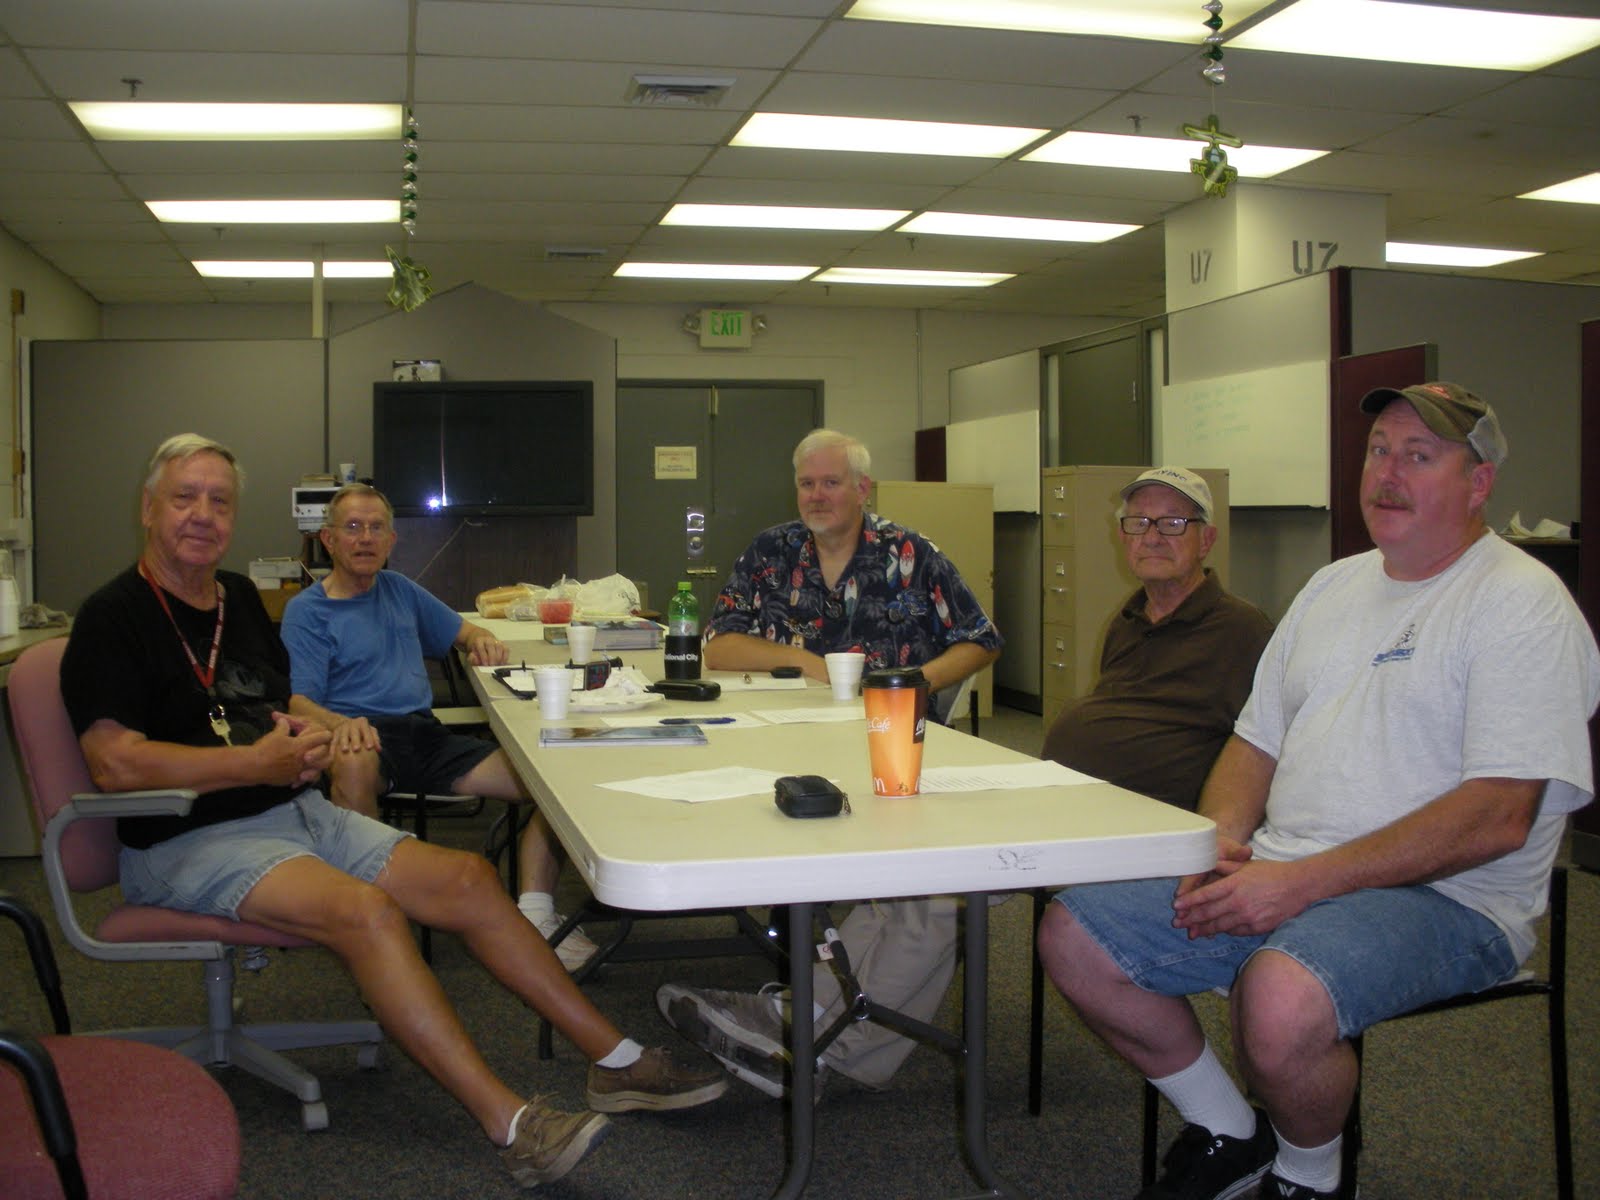
So, how do you take a pile of wood, and turn it into a set of finely crafted, and aerodynamically precise, wing ribs?  The answer to this is answered by the two gentlemen below.

Leo Drescher (left) and John Kraft (right).

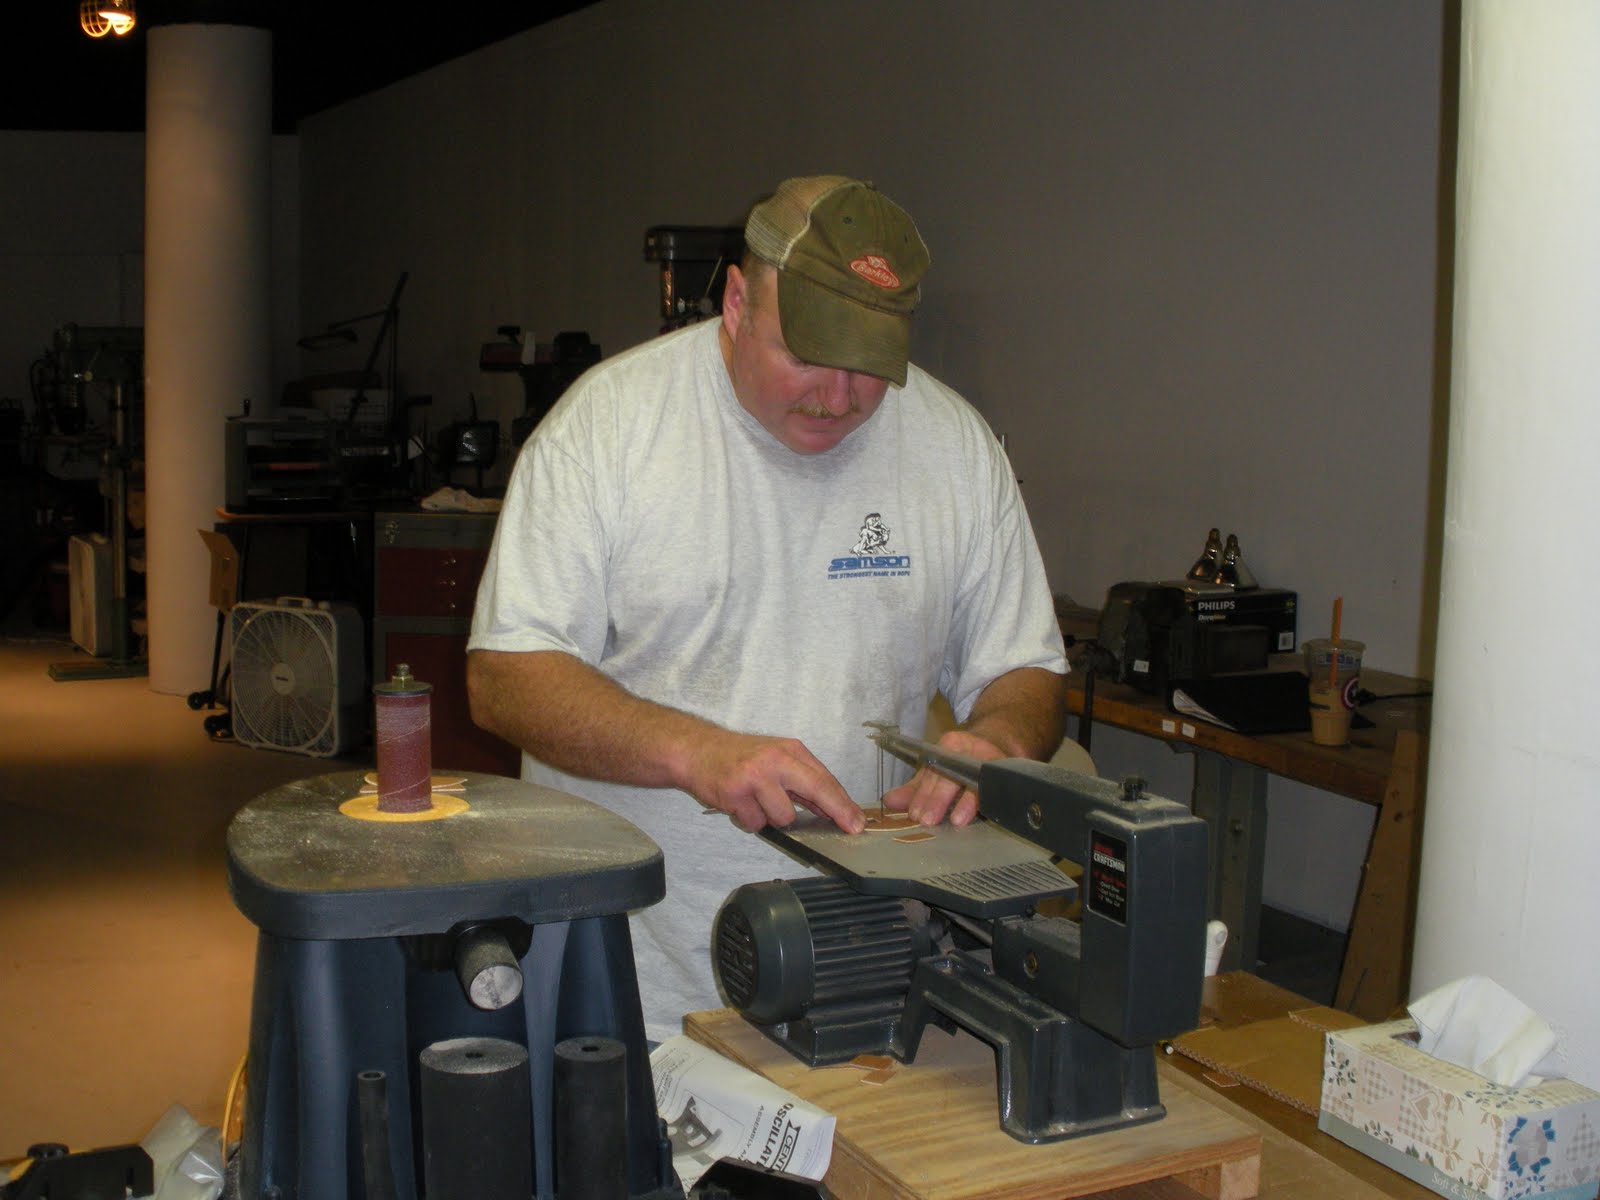
Leo and John were making the second and third ribs when I stopped in.  They had finished the cutting and fitting (sanding) process and were just starting the gluing process.  They were using a two part epoxy.  So, I didn't want to slow them since they had a limited amount of time to do the gluing once the epoxy was mixed.  I managed to stay out of their way while they did their magic.


Jig with parts in place.

The jig is important.  Hmm . . . let me rephrase that, the jig is VERY IMPORTANT ! ! !
It provides a consistent airfoil across the full length of the wing.  This jig was made from a perfectly flat piece of wood.  Then the full size drawing of the rib was glued to it.  Next, small wood blocks were screwed in place to hold the pieces in the EXACT position while being fitted, glued, and stapled.


This is a good view of the blocks of wood screwed into the jig.

I have to pause here and confess that my mouth is drooling.  I have done this soooo many times before with model airplanes.  If I didn't know the scale was so large, I would think it was a rib for a remote control airplane with a Cox .049 engine.  Those are great memories.

Leo and John, you guys get to have all the fun.  As for me, I just take pictures of you having fun  :-)


Brushing on epoxy.

Notice that the curved line just below the end of the glue brush.  That marks the location of the plywood gusset that will be attached.  You will see that Leo stopped the brush here, because he didn't want any glue past this point (extra weight).

John is applying the gusset.

Leo is stapling the gusset.

Initially, the staples were to big.  So, thinner staples were purchased.  Now, they don't split the .25" x .25" wood.

Note the extra piece of wood John is holding.

Sometimes an extra piece of wood is helpful to get the edge of the gusset lined up with the edge of the cap strip.


Rib removed from jig and placed on paper.

Oops, upside down, or sideways?  Sorry . . . .  The parts are now locked in place and even though the epoxy has not set, it can be removed and flipped over.


The process of gluing is repeated on the other side.

Add a gusset.


Add a couple of staples.

I noticed that two guys make a good team on rib building.  

Two hands would not be enough, and I suspect six hands would be too many.


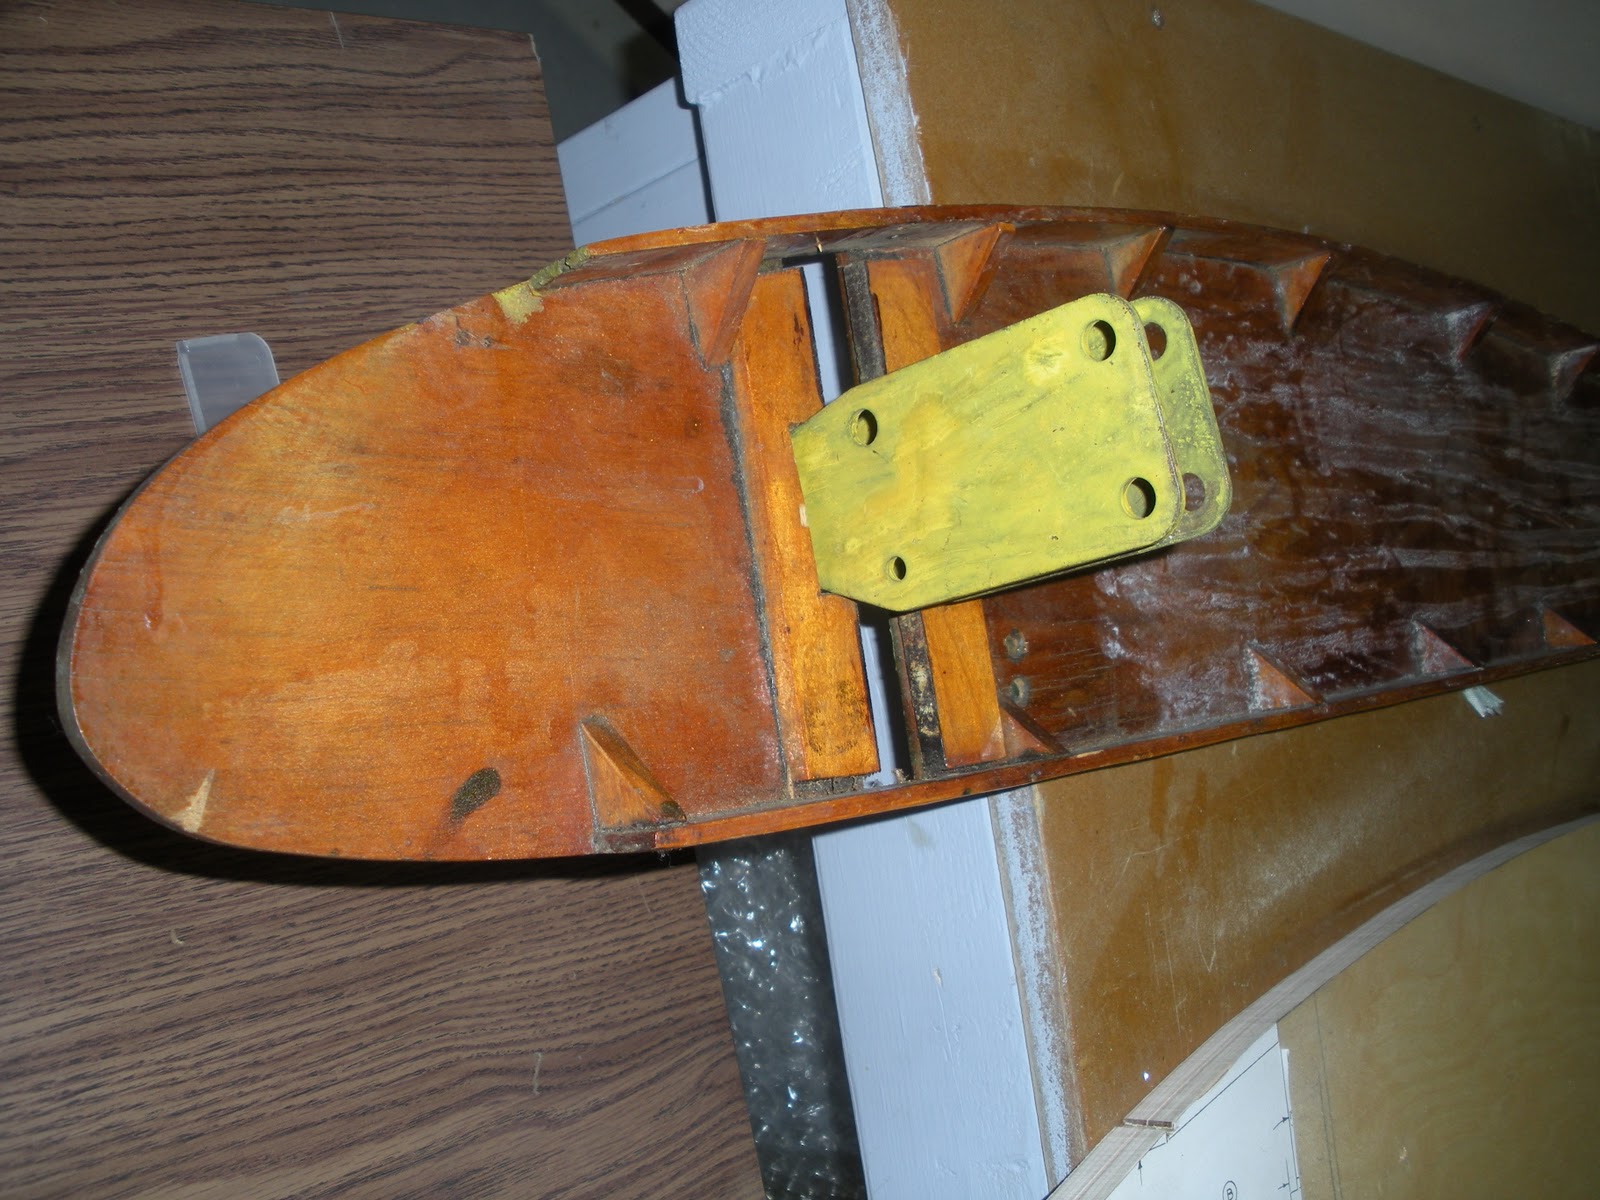
Cap strip forming tool.

Leo made this forming tool.  It is cut to match the curve of the top cap strip where it meets the nose piece.  The top cap strips are put in hot water for an hour, then put in this tool, and clamped.  After a couple of days the clamps are removed, and voila, very little spring back.  Neat, huh.

I should point out that although it is not immediately obvious, this tool will hold lots of .25" cap strips.

Here is a question.  I wonder how long it took Leo to cut this on the band saw?  A long time?  Any guesses?